

- ASP.NET Core 2 Service with ASP.NET Identity
- Add a Self-Hosted Server with SSL for Development
- Register External Authentication Providers
- Implement OAuth Implicit Flow
- Monkey Logon – OAuth Code Flow From Within an Ongoing Implicit Flow
- Monkey Logon – Xamarin Apps With OAuth2Authenticator
In this post, I will show how to initiate an OAuth Code Flow from within an ongoing OAuth Implicit Flow with .NET Core 2.0 and OpenIddict. This will allow users of my mobile app to log on to my web service using an external authentication provider. The previous article of this series demonstrated how to implement an OAuth Implicit Flow using OpenIddict. Now, I will demonstrate how to embed the OAuth Code flow.
Overview
The first article of this series outlines the authentication process described. In this article, this process will actually be implemented. Everything is happening in the AccountController class. The following diagram shows the steps of the process and the names of the related controller methods (note that the endpoint\action names are different from the method names, but we’ll get to that later).

Before we get to the code, let me describe the steps depicted above:
- A mobile application calls the authorize method to initiate a logon (the actual URL is ~/account/authorize). Alternatively, a user can call the login method using a browser (the URL is ~/account/login).
- Both methods return that exact same view. The view contains a list of authentication providers the user can choose from. In case of the authorize method, the view contains a hidden field with the encrypted content of the current request, e.g. the response_type, client_id, redirect_url, scope and state parameters of the Implicit Flow. In the following, I will refer to these parameters as the “original request parameters”.
- Once the user selects an authentication provider, the method ExternalLogin is called. This method will receive the name of the selected authentication provider as well as the original request parameters (in the authorize case) or a return URL (in the login case).
- The user gets redirect to the sign-in page of the selected authentication provider. The URL used for this redirection contains the parameters needed for an OAuth Code Flow. These are the response_type, client_id, redirect_url, scope and state parameters. The state parameter contains the original request parameters, which are encrypted because our client’s request is nobody else’s business. The user enters his\her user name and password and accepts the permission prompt.
- The user is redirected back to the URL specified with the redirect_url parameter. There may be some more communication between our service and the authentication provider under the hood (read here), but in the end either the method ExternalLoginCallback (in the login case) or ExternalLoginCallbackEmbedded (in the authorize case) are called. If the user is already known to our application, he’ll get signed-in and the token for the Implicit Flow is generated (see step 7). Otherwise, the user will be redirected to a user profile page (see step 6).
- Optional, but recommended: in case of a new user, the user is redirect to a profile page to edit name and picture. The method ExternalLoginConfirmation will create a new user entry in the ASP.NET Identity database. Thus, we map the external user profile to an internal user profile. This is necessary since the token of the Implicit Flow will be based on this internal profile.
- An access token for the original authentication request is created. The user is redirected to the URL specified by the original redirect_url parameter (which can be a deep link back to the mobile app).
Implementation
Since the existing application has been scaffolded using the web application template in Visual Studio, much of the needed code already exists. The previous articles of this series have described which code is not needed and can be removed and how to configure OpenIddict to add support for the OAuth Implicit Flow. Next, the code inside the AccountController class will be extended to support the process outlined above.
Step 1 – Show Initial View
[HttpGet]
[AllowAnonymous]
public async Task<IActionResult> Login(string returnUrl = null)
{
    // Clear the existing external cookie to ensure a clean login process
    await this.HttpContext.SignOutAsync(IdentityConstants.ExternalScheme);
    this.ViewData["ReturnUrl"] = returnUrl;
    return this.View();
}

[HttpGet("~/account/authorize")]
[AllowAnonymous]
public IActionResult Authorize(OpenIdConnectRequest request, string remoteError = null)
{
    this.ViewData["State"] = this.dataProtectionProvider.ProtectQueryString(this.Request.Query);
    return this.View(nameof(this.Login));
}
Both Login and Authorize are somewhat similar. Both return the same login view. The difference is that the Login method only stores the return URL in the view while Authorize stores the whole request parameters. The method ProtectQueryString internally concatenates all query string keys and values into a single sting, encrypts that string using an IDataProtector and then returns the encryption result as a base64 encoded string. The Login method also invalidates the cookie that stores the current authentication token.
Step 3 – Redirect to External Auth Provider
The view returned contains a list of the configured authentication providers. When the user chooses a provider, the method ExternalLogin is called. This method will receive the provider name as well as the return URL (in case of Login) or the encrypted original request (in case of Authorize).
Calling the external auth provider
[HttpPost]
[AllowAnonymous]
[ValidateAntiForgeryToken]
public IActionResult ExternalLogin(string provider, string returnUrl = null, string state = null)
{
    // Request a redirect to the external login provider.
    var redirectUrl = string.IsNullOrWhiteSpace(state)
        ? this.Url.Action(nameof(this.ExternalLoginCallback), "Account", new { returnUrl })
        : this.CreateReconstructableRedirectUrl(state);
    var properties = this.signInManager.ConfigureExternalAuthenticationProperties(provider, redirectUrl);
    return this.Challenge(properties, provider);
}

private string CreateReconstructableRedirectUrl(string state)
{
    return this.Url.Action(nameof(this.ExternalLoginCallbackEmbedded), "Account", new Dictionary<string, string>
    {
        {"a", "excb"},
        {DataProtectionProviderExtensions.StateQuerystringKey, state}
    });
}
The method ExternalLogin is called either with the returnUrl or with the state parameter, but not with both. Depending on whether one or the other parameter is provided, we will need to generate a different redirect URL (see step 5 in the diagram above). The ASP.NET authentication middleware will handle talking to the external authentication provider for us. To do so, it will encrypt the redirect URL provided by us into a new state parameter for the OAuth Code Flow it will perform.
Reconstructing the original request
Note than in the Authorize case, a query string called “a” with a static value is added. This query string is needed to “fool” OpenIddict. With the current configuration, OpenIddict only supports returning an access token form the same URL that has been called by the client (i.e. ~/account/authorize). We will have to make sure that the external authentication provider redirects back to this same URL (again, ~/account/authorize). Somehow, we must be able to distinguish between an original authentication request by the client and a redirect from the external authentication provider. The “a” query string enables us to do exactly that. If this query string exists, we’re in a redirect; if not, we’re in an original authentication request.
“But you’re adding this other query string that contains the encrypted original request, why not use this query string to distinguish the requests” you say? Since this query string contains the encrypted original request parameters, we’ll have to decrypt it on the way back. Therefore, a custom middleware will be introduced to watch for this query string (here, it’s called “_state_”), decrypt it and replace it with the decrypted value. That means, that the parameters of the original request are reconstructed and the request looks exactly as original request so we won’t be able to distinguish it if it wasn’t for the “a” query string. Here’s that middleware:
public class RequestReconstructionMiddleWare
{
    private readonly IDataProtectionProvider dataProtectionProvider;
    private readonly RequestDelegate next;

    public RequestReconstructionMiddleWare(RequestDelegate next, IDataProtectionProvider dataProtectionProvider)
    {
        this.next = next;
        this.dataProtectionProvider = dataProtectionProvider;
    }

    public Task Invoke(HttpContext httpContext)
    {
        var newQueryString = this.dataProtectionProvider.ReconstructQuerystring(httpContext.Request.Query);
        if (newQueryString != QueryString.Empty)
        {
            httpContext.Request.QueryString = newQueryString;
        }

        return this.next.Invoke(httpContext);
    }
}

public static class DataProtectionProviderExtensions
{
    public const string StateQuerystringKey = "_state_";
    private const string ProtectorName = nameof(DataProtectionProviderExtensions);

    public static string ProtectQueryString(this IDataProtectionProvider dataProtectionProvider, IQueryCollection query)
    {
        var l = string.Join("&", query.Keys.Select(k => $"{HttpUtility.UrlEncode(k)}={HttpUtility.UrlEncode(query[k])}"));
        var protector = dataProtectionProvider.CreateProtector(ProtectorName);
        var @protected = Convert.ToBase64String(protector.Protect(Encoding.UTF8.GetBytes(l)));
        return @protected;
    }

    public static QueryString ReconstructQuerystring(this IDataProtectionProvider dataProtectionProvider, IQueryCollection originalQuery)
    {
        var @protected = originalQuery[StateQuerystringKey].FirstOrDefault();
        if (@protected == null)
        {
            return QueryString.Empty;
        }

        var protector = dataProtectionProvider.CreateProtector(ProtectorName);
        var originalQueryString = originalQuery.Keys.Where(k => k != StateQuerystringKey);
        var queryString = string.Join("&", originalQueryString.Select(k => $"{HttpUtility.UrlEncode(k)}={HttpUtility.UrlEncode(originalQuery[k])}"));
        var state = Encoding.UTF8.GetString(protector.Unprotect(Convert.FromBase64String(@protected)));
        var newQueryString = new QueryString($"?{queryString}&{state}");

        return newQueryString;
    }
}
Step 4 – Sign In
At this point, the user has entered his\her credentials at the external authentication provider is being redirected back to our application. The redirect_url parameter sent to the authentication provider is not the one we specified above. Instead, it is signin-<somestring> with “somestring” being the name of the provider. This is a mechanism used by the ASP.NET Core Authentication framework. The redirect_url comes with yet another value for the state parameter, in which the ASP.NET Core Authentication middleware has encrypted the redirect URL specified by us. So if you see a redirect URL contains “signin-“, don’t worry – everything is as it should be 🙂
Step 5 – Process External User
Back at our application, the ASP.NET Core Authentication middleware calls the method we supplied in “our” redirect URL. That is ExternalLoginCallback (in the Login case) or ExternalLoginCallbackEmbedded (in the Authenticate case). ExternalLoginCallbackEmbedded just calls ExternalLoginCallback and passes an extra parameter: the name of the authentication scheme used. Here, the authentication scheme is “Bearer” for JwtBearer.
[HttpGet("~/account/authorize"), QueryStringRequired("a")]
[AllowAnonymous]
public async Task<IActionResult> ExternalLoginCallbackEmbedded(OpenIdConnectRequest request, string remoteError = null)
{
    return await this.ExternalLoginCallback(request.RedirectUri, remoteError, JwtBearerDefaults.AuthenticationScheme);
}

[HttpGet]
[AllowAnonymous]
public async Task<IActionResult> ExternalLoginCallback(string returnUrl = null, string remoteError = null, string scheme = null)
{
    if (remoteError != null)
    {
        this.ErrorMessage = $"Error from external provider: {remoteError}";
        return this.RedirectToAction(nameof(this.Login));
    }
    var info = await this.signInManager.GetExternalLoginInfoAsync();
    if (info == null)
    {
        return this.RedirectToAction(nameof(this.Login));
    }

    // Sign in the user with this external login provider if the user already has a login.
    var result = await this.signInManager.ExternalLoginSignInAsync(info.LoginProvider, info.ProviderKey, isPersistent: false, bypassTwoFactor: true);
    if (result.Succeeded)
    {
        this.logger.LogInformation("User logged in with {Name} provider.", info.LoginProvider);
        return scheme == JwtBearerDefaults.AuthenticationScheme
            ? await this.SignInWithOpenIdDict(await this.userManager.FindByLoginAsync(info.LoginProvider, info.ProviderKey))
            : this.RedirectToLocal(returnUrl);
    }
    if (result.IsLockedOut)
    {
        return this.RedirectToAction(nameof(this.Lockout));
    }

    // If the user does not have an account, then ask the user to create an account.
    this.ViewData["ReturnUrl"] = returnUrl;
    this.ViewData["LoginProvider"] = info.LoginProvider;
    if (scheme == JwtBearerDefaults.AuthenticationScheme)
    {
        this.ViewData["State"] = this.dataProtectionProvider.ProtectQueryString(this.Request.Query);
    }
    var email = info.Principal.FindFirstValue(ClaimTypes.Email);
    return this.View("ExternalLogin", new ExternalLoginViewModel { Email = email });
}
The method ExternalLoginCallback behaves almost as it would behave after being scaffolded by the Web Application template. The difference here is that we have to take account of the scheme used. In case of the JWT bearer authentication we’ll let OpenIddict create the response for us, in other cases (which default to the cookie authentication scheme here) we’ll just leave the default behavior as is. So at first, the code tries to sign-in the external user with ASP.NET Identity. If this succeeds, either an access token is generated and returned as a query string to the original redirect URL or an authentication cookie is generated and the user is redirected to the original redirect URL as well.
Step 6 – Create and Edit Internal User
If the user does not exist in the ASP.NET Identity database, all necessary state information (that is either the original redirect URL or the encrypted original request) is rendered into a view that is returned to the user. This view is a user profile page which provides the ability to edit the user name and image. When the user completes editing the user profile, the method ExternalLoginConfirmation is called.
[HttpPost]
[AllowAnonymous]
[ValidateAntiForgeryToken]
public async Task<IActionResult> ExternalLoginConfirmation(ExternalLoginViewModel model, string returnUrl = null, string state = null)
{
    if (this.ModelState.IsValid)
    {
        // Get the information about the user from the external login provider
        var info = await this.signInManager.GetExternalLoginInfoAsync();
        if (info == null)
        {
            throw new ApplicationException("Error loading external login information during confirmation.");
        }
        var user = new ApplicationUser { UserName = model.Email, Email = model.Email };
        var result = await this.userManager.CreateAsync(user);
        if (result.Succeeded)
        {
            result = await this.userManager.AddLoginAsync(user, info);
            if (result.Succeeded)
            {
                await this.signInManager.SignInAsync(user, isPersistent: false);
                this.logger.LogInformation("User created an account using {Name} provider.", info.LoginProvider);
                return !string.IsNullOrWhiteSpace(state)
                    ? this.Redirect(this.CreateReconstructableRedirectUrl(state))
                    : this.RedirectToLocal(returnUrl);
            }
        }
        this.AddErrors(result);
    }

    this.ViewData["ReturnUrl"] = returnUrl;
    return this.View(nameof(this.ExternalLogin), model);
}
The method ExternalLoginConfirmation creates the new user in the ASP.NET Identity database. That is, it maps the external user profile to a new internal user profile. If the user can be created successfully, either an authentication cookie is created and the user gets redirected to the original redirect URL, or the user gets redirected back to the ExternalLoginCallbackEmbedded method to re-check the user profile and create the acess token using OpenIddict.
Step 7 – Create Access Token
The method ExternallLoginCallback from above uses another method called SignInWithOpenIdDict:
private async Task<IActionResult> SignInWithOpenIdDict(ApplicationUser user)
{
    var principal = await this.signInManager.CreateUserPrincipalAsync(user);
    var ticket = principal.CreateAuthenticationTicket(this.identityOptions.ClaimsIdentity.SecurityStampClaimType);

    return this.SignIn(ticket.Principal, ticket.Properties, ticket.AuthenticationScheme);
}
SignInWithOpenIdDict creates a new ClaimsPrincipal object. The principal object contains the name of the user (here, this is the user’s email address), the user ID within the ASP.NET Identity database (remember the external user was mapped to an internal user) and a security stamp. The security stamp “is basically meant to represent the current snapshot of your user’s credentials. So if nothing changes, the stamp will stay the same. But if the user’s password is changed, or a login is removed (unlink your google/fb account), the stamp will change” (taken from Hao Kung‘s answer on stackoverflow.com). Then, an AuthenticationTicket is created. The ticket contains the scopes of claims included in the ticket, the resources it allows to access and the claims themselves. The ticket is the actual object that will be transformed into the JSON Web Token returned to the client.
The code to create the ticket is taken from the OpenIddict samples on GitHub:
public static class ClaimsPrincipalExtensions
{
    private static readonly Dictionary<string, string> IdentityClaimScopes = new Dictionary<string, string>
    {
        {OpenIdConnectConstants.Claims.Name, OpenIdConnectConstants.Scopes.Profile},
        {OpenIdConnectConstants.Claims.Email, OpenIdConnectConstants.Scopes.Email},
        {OpenIdConnectConstants.Claims.Role, OpenIddictConstants.Claims.Roles}
    };

    public static AuthenticationTicket CreateAuthenticationTicket(this ClaimsPrincipal principal, string securityStampClaimType)
    {
        // Create a new authentication ticket holding the user identity.
        var ticket = new AuthenticationTicket(principal,
            new AuthenticationProperties(),
            OpenIdConnectServerDefaults.AuthenticationScheme);

        // Set the list of scopes granted to the client application.
        ticket.SetScopes(OpenIdConnectConstants.Scopes.OpenId,
            OpenIdConnectConstants.Scopes.Email,
            OpenIdConnectConstants.Scopes.Profile,
            OpenIddictConstants.Scopes.Roles);

        ticket.SetResources(ApplicationInfo.AppName);

        // Note: by default, claims are NOT automatically included in the access and identity tokens.
        // To allow OpenIddict to serialize them, you must attach them a destination, that specifies
        // whether they should be included in access tokens, in identity tokens or in both.
        foreach (var claim in from c in ticket.Principal.Claims
                              // Never include the security stamp in the access and identity tokens, as it's a secret value.
                              where c.Type != securityStampClaimType
                              select c)
        {
            var destinations = new List<string>
            {
                OpenIdConnectConstants.Destinations.AccessToken
            };

            if (IdentityClaimScopes.TryGetValue(claim.Type, out string scope) && ticket.HasScope(scope))
            {
                destinations.Add(OpenIdConnectConstants.Destinations.IdentityToken);
            }

            claim.SetDestinations(destinations);
        }

        return ticket;
    }
}
Trying it out
Now that we’ve put all bits and pieces together, we should be able to authenticate to our application using an external authentication provider and call our API endpoints. Lets try it out.
Registering Clients
Before trying out the implemented authentication process, we must first register an OAuth client for our application (this is the local equivalent to registering our application with the external auth provider). To do so, add the following line at the end of the Configure method in startup.cs:
OpenIdDictInitializer.InitializeAsync(app.ApplicationServices, CancellationToken.None).GetAwaiter().GetResult();
OpenIdDictInitializer is implemented as following:
public class OpenIdDictInitializer
{
    public static async Task InitializeAsync(IServiceProvider services, CancellationToken cancellationToken)
    {
        // Create a new service scope to ensure the database context is correctly disposed when this methods returns.
        using (var scope = services.GetRequiredService<IServiceScopeFactory>().CreateScope())
        {
            var context = scope.ServiceProvider.GetRequiredService<ApplicationDbContext>();
            await context.Database.EnsureCreatedAsync(cancellationToken);

            var manager = scope.ServiceProvider.GetRequiredService<OpenIddictApplicationManager<OpenIddictApplication>amp;amp;amp;amp;gt;();

            if (await manager.FindByClientIdAsync("monkeylogonclient", cancellationToken) == null)
            {
                var application = new OpenIddictApplication
                {
                    ClientId = "monkeylogonclient",
                    DisplayName = "MonkeyLogon Client",
                    Type = "public",
                    RedirectUri = "com.example.mhuss.monkeylogon:/oauth2redirect"
                };

                await manager.CreateAsync(application, cancellationToken);
            }

            if (await manager.FindByClientIdAsync("browser-test", cancellationToken) == null)
            {
                var application = new OpenIddictApplication
                {
                    ClientId = "browser-test",
                    DisplayName = "browser-test",
                    Type = "public",
                    RedirectUri = "http://localhost"
                };

                await manager.CreateAsync(application, cancellationToken);
            }
        }
    }
}
The code above registers two clients: the mobile application we’ll use later and a test client that will enable us to test the authentication process in the browser. Note that both clients have the type “public”. This means that both clients don’t need a client ID and are considered insecure. This is exactly what we need when we want to use a client that runs on the user’s device.
Manually Perform Authentication process
Now let’s try to get some bananas. User Postman and call the Banana endpoint. Note that we’re calling the HTTP, not the HTTPS endpoint here. This is because Postman blocks self-signed certificates by default and I’m too lazy to configure it to allow them.
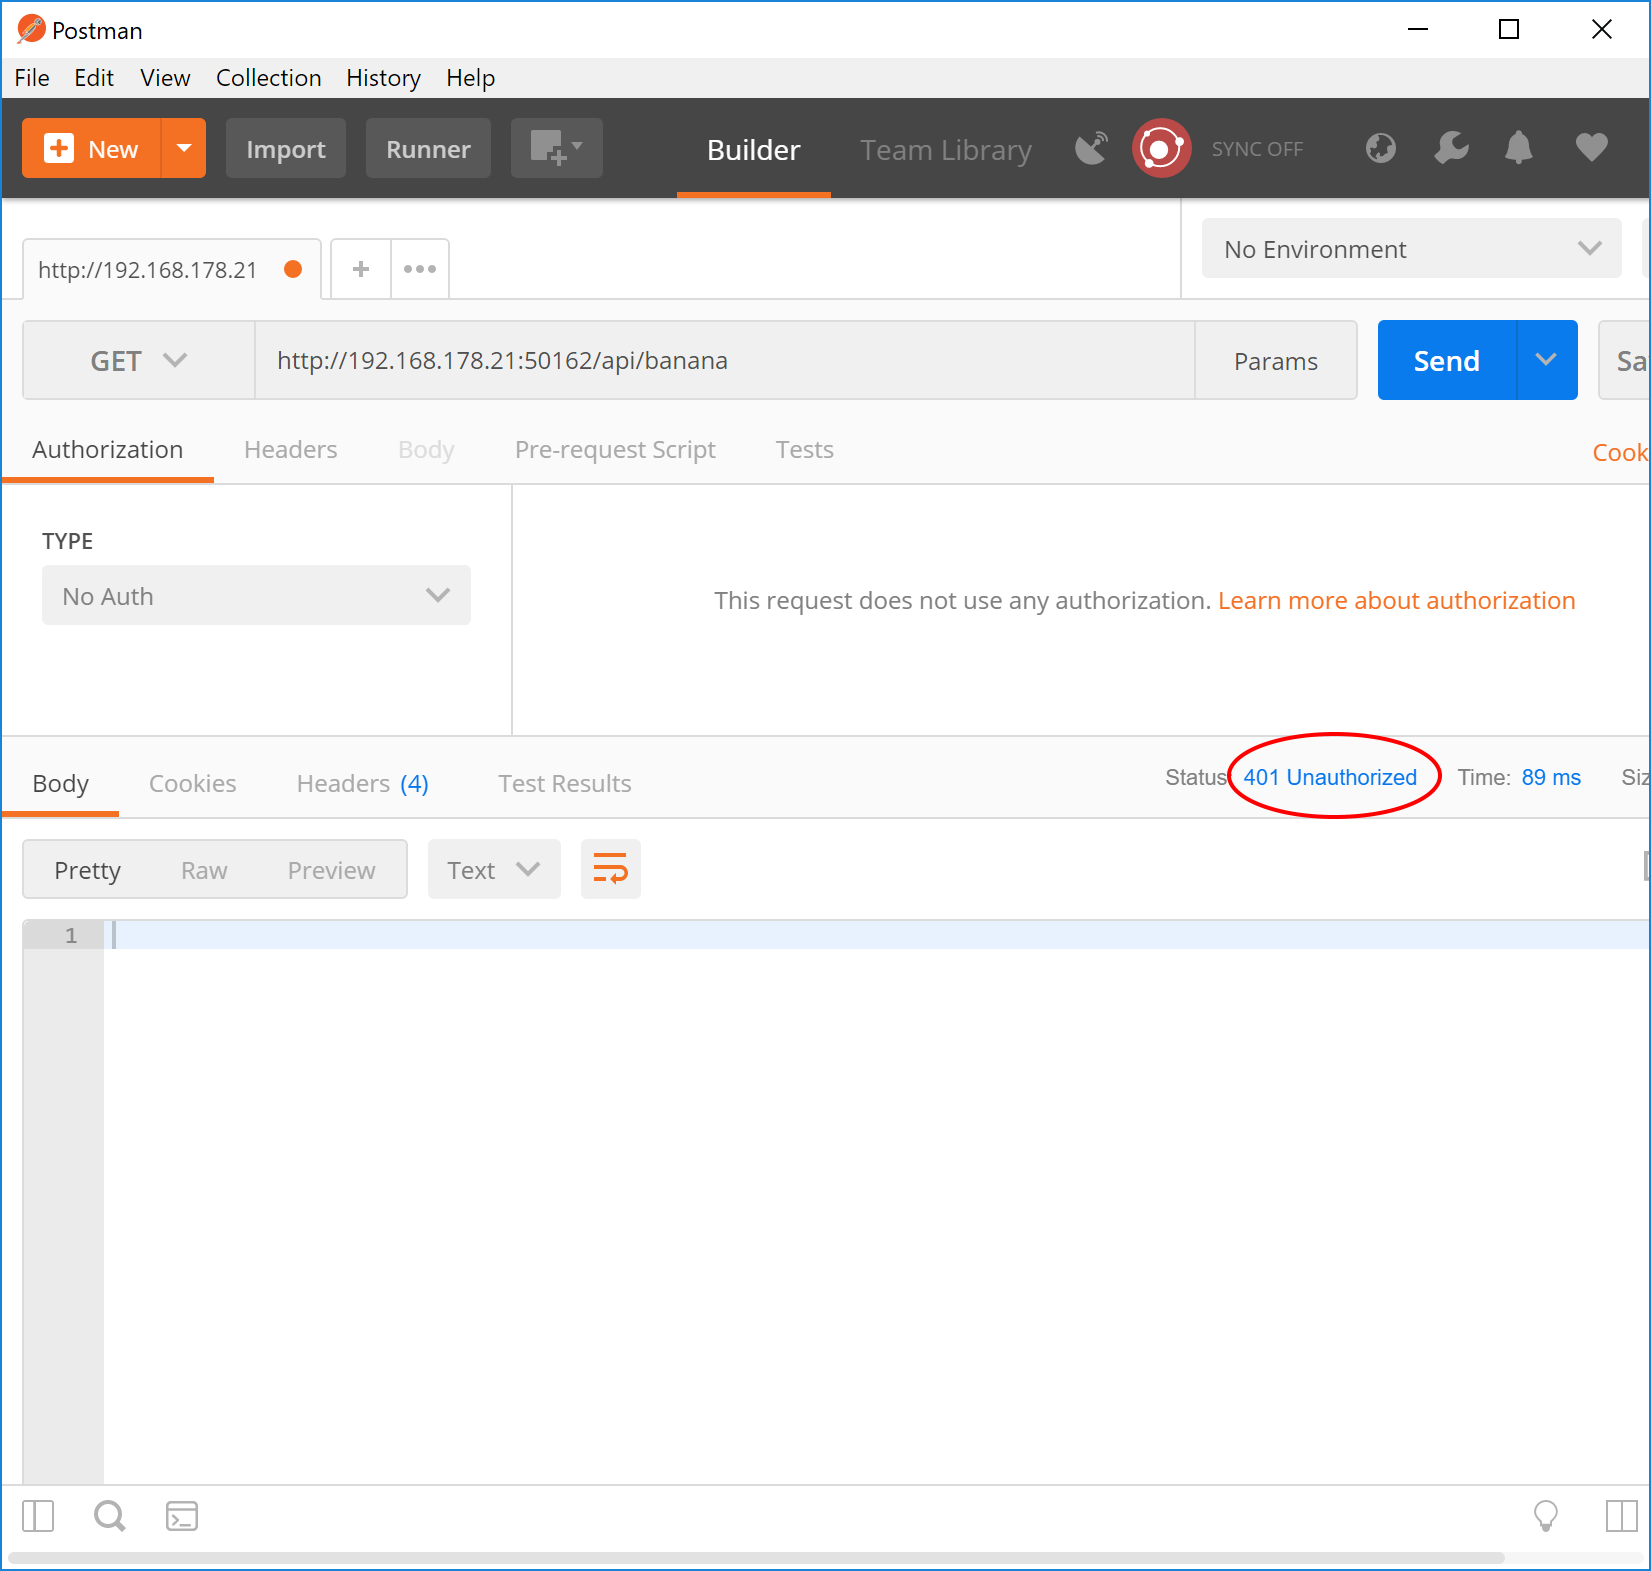
The application expectedly responds with an HTTP 401 code. To authenticate, open the browser and call https://192.168.178.21:50163/account/authorize?client_id=browser-test&redirect_uri=http%3A%2F%2Flocalhost&response_type=token. The bold parts in the URL are the request parameters needed for the implicit flow. Normally, clients will add a state parameter for security reasons (as will the mobile client later), but for this simple test, we’ll just ignore it. Note that we’re using HTTPS here. This is necessary because external authentication providers usually don’t allow redirecting to non-HTTPS addresses.
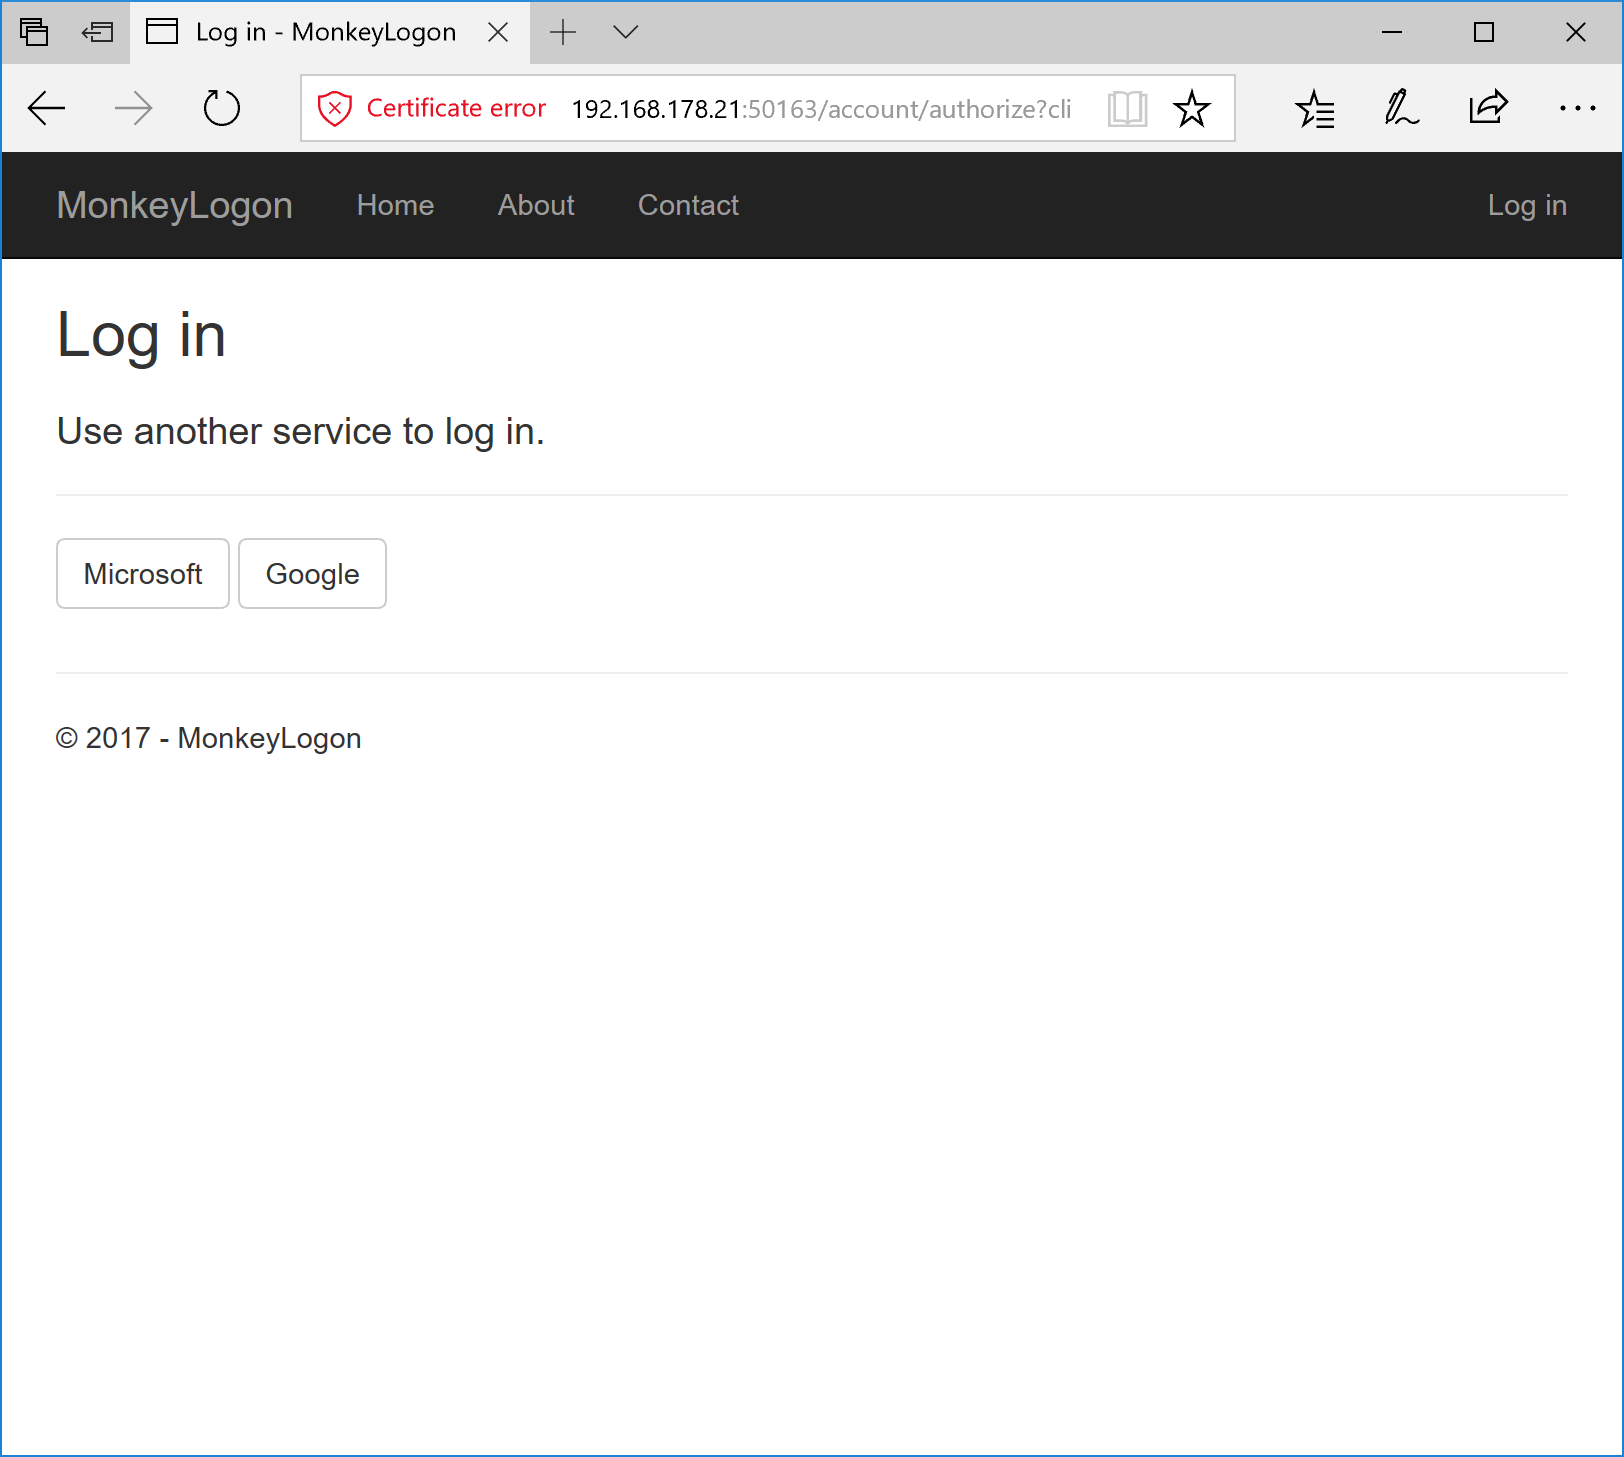
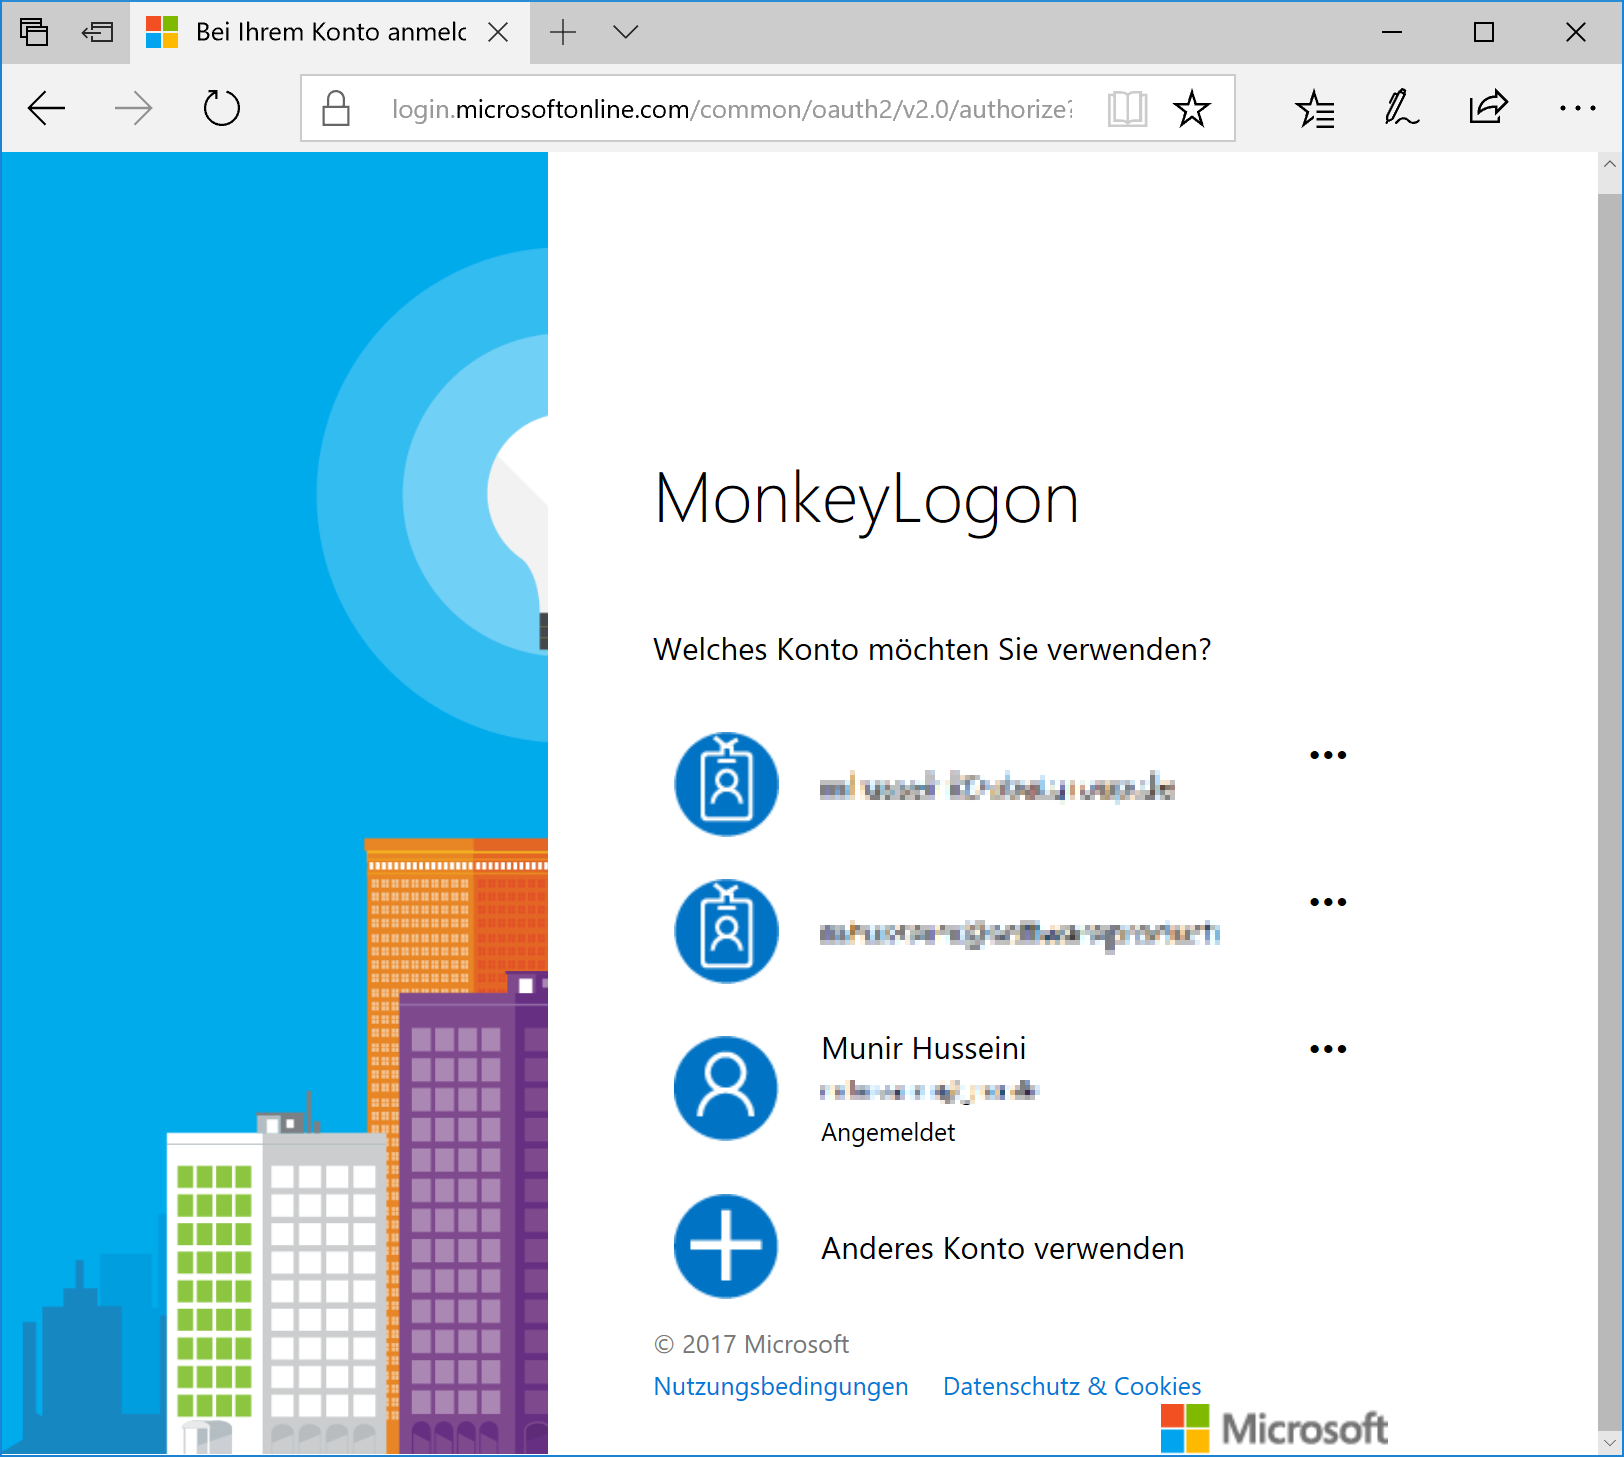
Now, choose an authentication provider and sign in.
After successful authentication, the external provider redirects to “localhost”, providing the access token in a query string.

The full URL we were redirected to is:
http://localhost/#resource=monkeylogon&scope=openid%20email%20profile%20roles&token_type=Bearer&access_token=eyJhbGciOiJSUzI1NiIsImtpZCI6Ijg4RjlENzhDODQyQzREMjZFNDU1NkFFM0JDQUVCQkMyNTZERkY1REIiLCJ0eXAiOiJKV1QifQ.eyJzdWIiOiIxMjc5YzczNS0yZTRhLTQ5OGQtYjNhNC01YTcyZjJiYTFiNGYiLCJuYW1lIjoibS5odXNzZWluaUBnbXguZGUiLCJ0b2tlbl91c2FnZSI6ImFjY2Vzc190b2tlbiIsImp0aSI6IjJkZjRhYjVkLWRkZmYtNGVjYy1iMWI5LWVkZTVkNmQwNWY2NyIsInNjb3BlIjpbIm9wZW5pZCIsImVtYWlsIiwicHJvZmlsZSIsInJvbGVzIl0sImF1ZCI6Im1vbmtleWxvZ29uIiwiYXpwIjoiYnJvd3Nlci10ZXN0IiwibmJmIjoxNTA5NTMzNDY5LCJleHAiOjE1MDk1MzcwNjksImlhdCI6MTUwOTUzMzQ2OSwiaXNzIjoiaHR0cHM6Ly8xOTIuMTY4LjE3OC4yMTo1MDE2My8ifQ.NvGN1DtjP9pEJvKs3gHMnDx1q1eFi75aDzqATuXtsKs8fHcdyphkmS3dqhqAqwP6WwrYiaCQTW32H9e3eNE-f5qY3OlMVtcSyLGCcWeyE5SoP05jsDE-9s1vRNIB5-1SX4FQZK0zrzAQv9DBt9OH9Pz5jHAuvDSlGbUS_3Vn6u2H-n0ECcHf4PRl18Ulo4K1FhfVH7vyQmV35GTH7RnERT0wwoz8LiUu0c-22xL9QbOdp1EVuVVUrbyk1EuuWOEwAK1uMBlYt8o6DqL1em0rzfDfjxyYGmeWwDDm9Mcdv_7A_iOzR0fq0LpWKQRd_RJT_OW5_XTwPCAKKf1xYuwQag&expires_in=3600
The bold part is the access token. This is the part that the client must send to the server with each subsequent request to be authenticated. So manually copy this string and paste it as the value of an Authorization header in Postman. Remember to prefix it with the string defined by the token_type query string (here: “Bearer”).
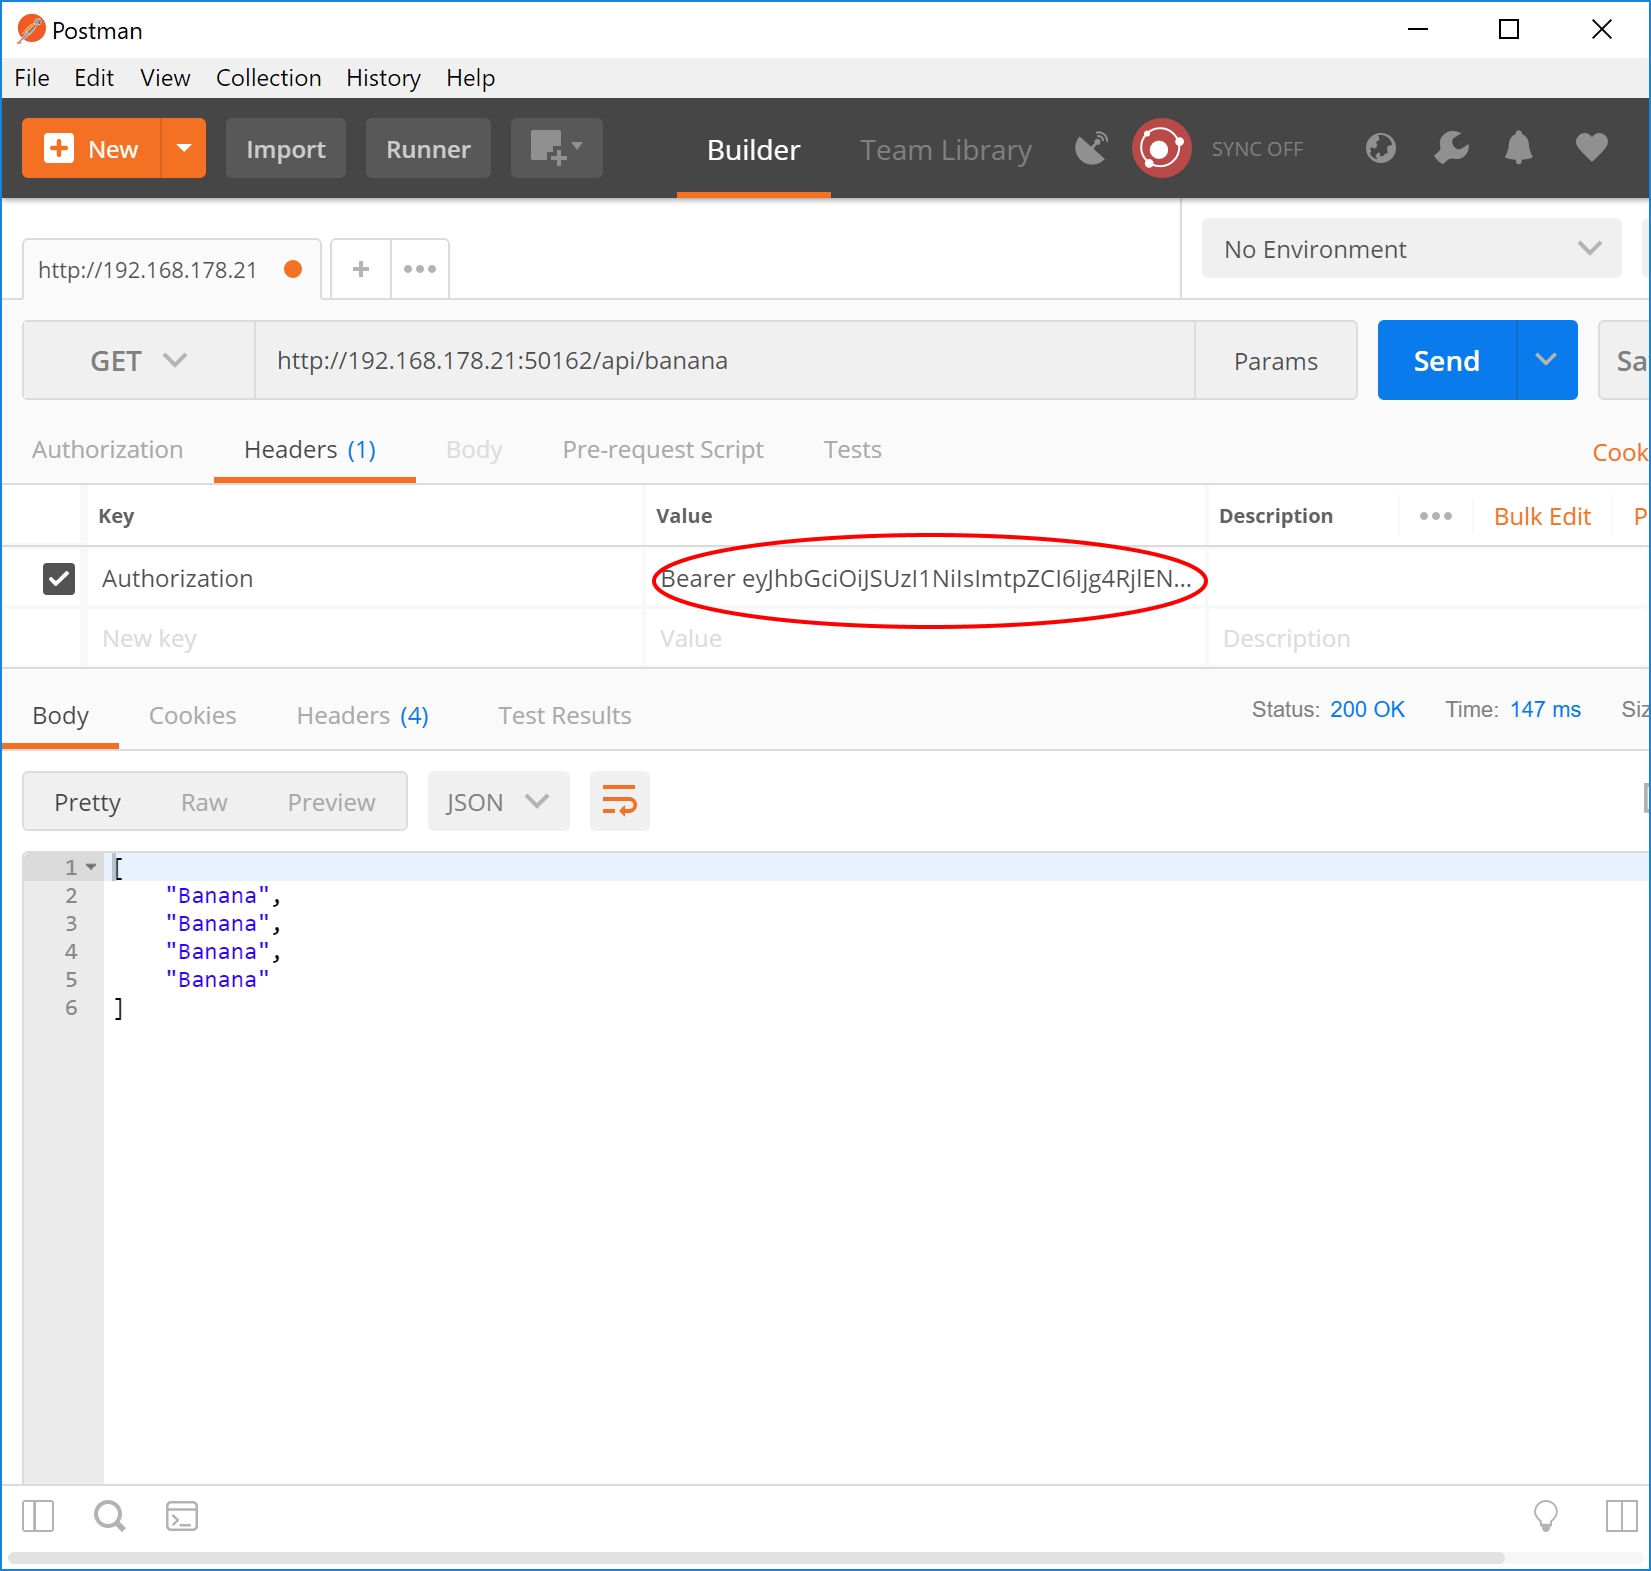
The request succeeds now and we get our bananas. Yaaay 🙂 The next thing to do is to implement the client part in the mobile application – i.e. calling a resource, detecting the 401, showing a browser to the user, extracting the access token and using it for subsequent requests. This is the subject of the next article.
The sample code can be found at https://github.com/mhusseini/monkeylogon.
