

In the previous article of this series, we added external authentication providers to the sample application. In this article, we’ll implement the OAuth Implicit Flow and add support for JSON Web Tokens instead of cookies.
As mentioned in the first article of the series, we want to implement an OAuth Implicit Flow with an embedded OAuth Code Flow. At the moment, have a working cookie authentication with external authentication providers which implement the OAuth Code Flow. Next, we need to wrap the existing authentication process in an OAuth Implicit Flow. We’ll use OpenIddict to implement the flow (i.e. how to perform logon requests) and to add JWT Bearer authentication (i.e. to persist identity information).
Add OpenIddict for OAuth Implicit Flow
Enter OpenIddict, “a simple and easy-to-use solution to implement an OpenID Connect server in any ASP.NET Core 1.x or 2.x application”. We will add the OAuth Implicit Flow to our application with the help of this library. There are some good examples of how to do this on the web, such as this article by Kévin Chalet or this one by Damien Bowden. Additionally, there are the ASP.NET Core/JavaScript samples for OpenIddict .
The first thing to note is that OpenIddict is not available on nuget.org (yet?). Instead, it is available on the asp-net contrib repository on MyGet. To enable this repository in your solution, follow the following steps:
- Add a new file named “nuget.config” at the root of your solution (i.e. in the same directory as the .sln).
- Add the following code:
<?xml version="1.0" encoding="utf-8"?> <configuration> <packageSources> <add key="NuGet" value="https://api.nuget.org/v3/index.json" /> <add key="aspnet-contrib" value="https://www.myget.org/F/aspnet-contrib/api/v3/index.json" /> </packageSources> </configuration> - Close and reopen the solution.
Add the OAuth Implicit Flow
In the file startup.cs, change the method ConfigureServices as described in the following. First, register the entity sets needed by OpenIddict to the EF DbContext of ASP.Net Identity.
services.AddDbContext<ApplicationDbContext>(options =>
{
    options.UseSqlServer(this.Configuration.GetConnectionString("DefaultConnection"));
    options.UseOpenIddict();
});
Now, add ASP.NET Identity with the default implementation of the ASP.NET Identity store and the default token providers. This code should already exist since it’s part of the web application template.
services.AddIdentity<ApplicationUser, IdentityRole>()
    .AddEntityFrameworkStores<ApplicationDbContext>()
    .AddDefaultTokenProviders();
Configure Identity to use the same JWT claims as OpenIddict instead of the legacy WS-Federation claims it uses by default. So Clear that mapping and set new mappings.
JwtSecurityTokenHandler.DefaultInboundClaimTypeMap.Clear();
JwtSecurityTokenHandler.DefaultOutboundClaimTypeMap.Clear();

services.Configure<IdentityOptions>(options =>
{
    options.ClaimsIdentity.UserNameClaimType = OpenIdConnectConstants.Claims.Name;
    options.ClaimsIdentity.UserIdClaimType = OpenIdConnectConstants.Claims.Subject;
    options.ClaimsIdentity.RoleClaimType = OpenIdConnectConstants.Claims.Role;
});
Add the certificate with which we want to encrypt and validate the JSON Web Tokens created by the application.
var cert = new X509Certificate2(Path.Combine(this.environment.ContentRootPath, "monkeylogon.pfx"), "");
Now, add OpenIddict and configure it to support OAuth Implicit Flow.
services.AddOpenIddict(options =>
{
    options.AddEntityFrameworkCoreStores<ApplicationDbContext>()
        .AddMvcBinders()
        .EnableAuthorizationEndpoint("/account/authorize")
        .EnableLogoutEndpoint("/account/logout")
        .EnableUserinfoEndpoint("/api/me")
        .AllowImplicitFlow()
        .UseJsonWebTokens()
        .AddSigningCertificate(cert);

    if (this.environment.IsDevelopment())
    {
        options.DisableHttpsRequirement();
        options.AddEphemeralSigningKey();
    }
});
In the code block above, these are the actions performed (line by line starting at line 21):
- AddEntityFrameworkCoreStores: Add the tables necessary for OpenIddict to the ASP.NET Identity database context.
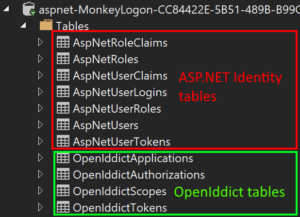
ASP.NET Identity and OpenIddict tables - AddMvcBinders: add automatic recognition of authentication request parameters and creation of the response in the ASP.NET MVC controllers (we’ll get to that in the next article).
- EnableAuthorizationEndpoint: set the URL for logon requests.
- EnableLogoutEndpoint: set the URL to invalidate a authentication token.
- EnableUserinfoEndpoint: set the URL that provides the User Info Endpoint.
- AllowImplicitFlow: allow processing of authorization requests using the implicit flow.
- UseJsonWebTokens: register a SecurityTokenHandler that converts a Json Web Token(JWT) to user claims and vice versa.
- AddSigningCertificate: set the certificate with which the JWT is signed and validated.
- AddEphemeralSigningKey: “Register a new ephemeral key that is discarded when the application shuts down. Tokens signed using this key are automatically invalidated” (from source comments).
Next, change the the default authentication handlers for the “authenticate” and the “challenge” verbs (for a very good explanation of what authentication handlers are, see this article by David McCullough).
services.AddAuthentication(options =>
    {
        options.DefaultAuthenticateScheme = JwtBearerDefaults.AuthenticationScheme;
        options.DefaultChallengeScheme = JwtBearerDefaults.AuthenticationScheme;
    })
The verb authenticate “gets the user’s information if any exists (e.g. decoding the user’s cookie, if one exists)” and the verb challenge “requests authentication by the user (e.g. showing a login page)”. By setting the scheme property, we set the name of the authentication handler that implements the verb.
Now add the JWT Bearer authentication.
    .AddJwtBearer(options =>
    {
        options.Audience = ApplicationInfo.AppName;
        options.ClaimsIssuer = ApplicationInfo.AppName;
        options.TokenValidationParameters = new TokenValidationParameters
        {
            NameClaimType = OpenIdConnectConstants.Claims.Name,
            RoleClaimType = OpenIdConnectConstants.Claims.Role,
            ValidAudience = ApplicationInfo.AppName,
            ValidIssuer = ApplicationInfo.GetUrl(),
            IssuerSigningKey = new RsaSecurityKey(cert.GetRSAPrivateKey().ExportParameters(false))
        };
In the code block above, these are the actions performed (line by line starting at line 41):
- AddJwtBearer: register the type JwtBearerHandler as the authentication handler with the name specified by JwtBearerDefaults.AuthenticationScheme (it is “Bearer”).
- Audience: set the value if the “aud” claim in the JWT. “The “aud” (audience) claim identifies the recipients that the JWT is intended for. Each principal intended to process the JWT MUST identify itself with a value in the audience claim. If the principal processing the claim does not identify itself with a value in the “aud” claim when this claim is present, then the JWT MUST be rejected. In the general case, the “aud” value is an array of case-sensitive strings, each containing a StringOrURI value. In the special case when the JWT has one audience, the “aud” value MAY be a single case-sensitive string containing a StringOrURI value. The interpretation of audience values is generally application specific. Use of this claim is OPTIONAL.” (RFC 7519)
- ClaimsIssuer: set the value if the “iss” claim in the JWT. “The “iss” (issuer) claim identifies the principal that issued the JWT. The processing of this claim is generally application specific. The “iss” value is a case-sensitive string containing a StringOrURI value. Use of this claim is OPTIONAL.” (RFC 7519)
- NameClaimType: set the name of the claim in the JWT that specifies the user name.
- RoleClaimType: set the name of the claim in the JWT that specifies the user’s role.
- ValidAudience: set the value of the “aud” claim in the JWT considered valid.
- ValidIssuer:set the value of the “iss” claim in the JWT considered valid.
- IssuerSigningKey: set the signing key used to validate the JWT’s signature. Derive the key from the certificate used to create the JWT.
The service must return a 401 for unauthenticated requests to the virtual directory “api”. Add that. Other requests will be answered with a redirect to the login page by default.
        options.Events = new JwtBearerEvents
        {
            OnAuthenticationFailed = context =>
            {
                if (context.Request.Path.Value.StartsWith("/api"))
                {
                    context.Response.StatusCode = (int)HttpStatusCode.Unauthorized;
                }

                return Task.CompletedTask;
            }
        };
    })
Trying (some of) it out
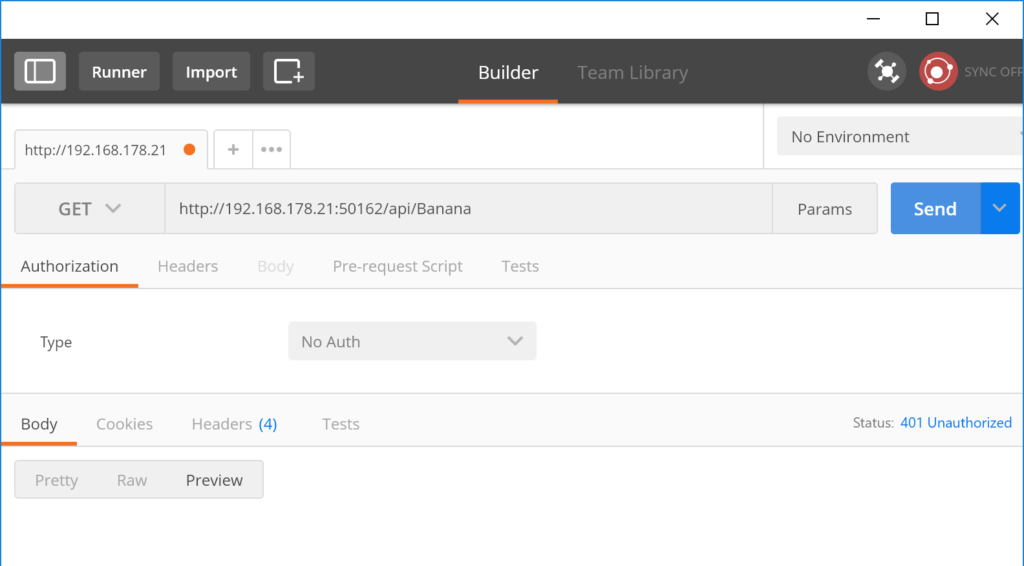
What we’ve got now is a web application that supports JWT bearer authentication. We configured the system to respond with HTTP code 401 for unauthenticated requests. If we tried to call the Banana service in Postman again, we won’t be redirected to the login page but instead, we will get an HTTP 401.
Now, a user should be able to log on. Actually, if there were any users in the ASP.NET Identity database, they would be able to log on using the “logon” endpoint we’ve configured earlier. Upon successful logon, a JWT is returned and that token can be sent with each subsequent request to authenticate the user. But the problem is, there aren’t any users in the database. Also, we’ve removed all code that allows users to register to our app. Instead, we want to redirect the user to an external authentication provider, make him authenticate himself there, get the authorization token from that provider, read the user information and save it into our own ASP.NET Identity database. Then, we can mark this user as logged in, create an own JWT (or better: make OpenIddict create one for us) and send that JWT to the initial caller. This process will be described in the next article.
The sample code can be found at https://github.com/mhusseini/monkeylogon.