

In this article, I will show how to implement async form validation with ASP.NET Core, Vue.js and Dryv. In the the previous article, I showed how to implement basic form validation that had async validation rules that were executed on the server only. This article shows how to move those async validation calls to the client.
Introduction
This article applies to Dryv 3.1 onwards.
As explained in the previous article, with Dryv you can specify validation rules in C# and have them automatically translated to JavaScript, which eliminates the need to implement the validation in more than one programming language. Of course, translating a C# expressions like model.Age > 18 or string.IsNullOrWhiteSpace(model.Person.FirstName) to JavaScript (model.age > 18 or (!/\S/.test(model.person.firstName || “”), respectively) is quite straight forward. In contrast, server calls are much more complex and rely on third party libraries as well on the server as on the client, thus can’t be automatically translated.
To facilitate this problem, you can extend Dryv to generate custom client code. For instance, the IMethodCallTranslator allows you to implement custom translation for any desired type and method call. To enable asynchronous validation, these are the steps to take:
- Create a C# wrapper for the required asynchronous validation.
- Inject the validation wrapper into the validation rules via the DryvRules.Rule<> method, not the DryvRules.ServerRule<> method.
- Implement a custom translator for the validation wrapper.
- Create a client side wrapper for the AJAX calls.
- Expose the asynchronous validation in a controller.
Create a C# wrapper for the required async validation
Whatever asynchronous validation library or service you use, you can wrap the validation in a single class. Since the wrapper class is registered with ASP.NET’s DI container, the wrapper itself can require additional services that get injected upon instantiation. In this example, we’ll just use Task.Delay and some silly validation. I’ll just call this wrapper AsyncValidator.
public class AsyncValidator
{
    public async Task<DryvResultMessage> ValidateZipCode(string zipCode, string city)
    {
        await Task.Delay(500);
        return new Regex("^[2468]+$").IsMatch(zipCode) ? null : "The ZIP code must only contain even numbers.";
    }
}
And don’t forget ro register the wrapper with the DI container.
public void ConfigureServices(IServiceCollection services)
{
    services.AddSingleton<AsyncValidator>();
}
Inject the validation wrapper into the validation rules
In the previous article, I showed how to use async form validation with server-only rules. Now, we want to use those rules in the server and the client. To do that, we just need to register the rule with DryvRules.Rule<> and not with DryvRules.ServerRule<>.
public class Address
{
    private static DryvRules<Address> ValidationRules = DryvRules.For<Address>()
        .Rule(a => a.ZipCode, a => !a.Deactivated && string.IsNullOrWhiteSpace(a.ZipCode) ? "Please enter a ZIP code." : null)
        .Rule(a => a.ZipCode, a => !a.Deactivated && a.ZipCode.Trim().Length < 5 ? "ZIP code must have at least 5 characters." : null)
        .Rule(a => a.City, a => !a.Deactivated && string.IsNullOrWhiteSpace(a.City) ? "Please enter a city." : null)
        .Rule<AsyncValidator>(a => a.ZipCode, (a, v) => a.Deactivated ? null : v.ValidateZipCode(a.ZipCode, a.City));

    [DryvRules]
    public string ZipCode { get; set; }

    [DryvRules]
    public string City { get; set; }

    public bool Deactivated { get; set; }
}
If you run the code now, you’ll get an exception as soon as you hit the page.
Dryv.Translation.DryvMethodNotSupportedException: ‘Calls to method AsyncValidator.ValidateZipCode are not supported. Are you missing a custom translator? Implement IMethodCallTranslator or ICustomTranslator to add custom translators.’
Pretty clear what’s wrong – we need to tell Dryv how to translate the AsyncValidator.
Implement a custom translator
There are two types of custom translators in Dryv:
- IMethodCallTranslator: a translator that only translates method call expressions. The translator specifies the type and the method names it can handle and only get’s called when these methods are encountered during translation.
- ICustomTranslator: a translator that can translate any expression. This translator is called at every expression encountered during translation and may or may not translate it.
For the current problem, implementing an IMethodCallTranslator is the best approach. To make things easier, Dryv provides an abstract class named MethodCallTranslator that can be used as a base class.
public class AsyncValidatorTranslator : MethodCallTranslator
{
    public AsyncValidatorTranslator()
    {
        this.Supports<AsyncValidator>();
        this.AddMethodTranslator(new Regex(".*"), TranslateAnyMethod);
    }

    private static void TranslateAnyMethod(MethodTranslationContext context)
    {
        context.Writer.Write("Dryvue.validateAsync('");
        context.Writer.Write(context.Expression.Method.Name);
        context.Writer.Write("', {");

        var sep = string.Empty;
        var method = context.Expression.Method;
        var methodParameters = method.GetParameters();
        var i = 0;

        foreach (var argument in context.Expression.Arguments)
        {
            var parameter = methodParameters[i++];
            context.Writer.Write(sep);
            context.Writer.Write(parameter.Name);
            context.Writer.Write(": ");

            // Let Dryv translate each parameter expression.
            context.Translator.Translate(argument, context);
            sep = ",\n";
        }

        context.Writer.Write("})");
    }
}
With this translator, the async call we added to the rule above will be translated like this:
Dryvue.validateAsync('ValidateZipCode', {zipCode: a.billingAddress.zipCode,
city: a.billingAddress.city})
Now all we need to do is to register the custom translator with Dryv in startup.cs.
public void ConfigureServices(IServiceCollection services)
{
    services.AddSingleton<AsyncValidator>();
    services
        .AddMvc(options => options.EnableEndpointRouting = true)
        .AddDryv()
        .AddTranslator<AsyncValidatorTranslator>();
}
When we run the code, hit the page and try to validate the form, we now get the following JavaScript error in the browser:
ReferenceError: Dryvue is not defined
So the generated client code seems to work, we just need to supply our client validation wrapper.
Create a client side wrapper for the AJAX calls
So next, let’s implement a client side wrapper. This will be very short, so without further ado, here you go…
<script>
    const Dryvue = {
        async validateAsync(name, data) {
            const params = Object.keys(data).map(k => `${k}=${encodeURIComponent(data[k])}`);
            const url = `/Validation/${name}?${params.join('&')}`;

            const response = await axios.get(url);

            return response.data && response.data.text;
        }
    };
</script>
This function takes the name of the server endpoint (which, not really coincidentally, matches the method name of the server-side validation wrapper) and the data to validate. The function uses the endpoint name to determines the URL to call. In real-world applications, you’d probably not rely on fixed URLs like here, but use the routing infrastructure to determine the URL dynamically.
The previous article shows how to use the translated validation code in a Vue.js app. We will use almost the same approach here, please refer to that article for details on the implementation. Since we’re dealing with asynchronous validation here, the form validation code must be changed accordingly. So here’s the updated code of the Vue component that handles each field’s validation:
Vue.component('form-input',
{
    props: ['value', 'type', 'name', 'label'],
    template: '#form-input',
    data() {
        return {
            error: null
        }
    },
    created() {
        const validator = window.dryv.validators[this.name];
        if (!validator) return;

        const formValidators = this.$parent.formValidators || (this.$parent.formValidators = []);
        formValidators.push({
            validate: async () => (this.error = await validator(this.$parent)),
            setError: errors => this.error = errors[this.name]
        });
    }
});
And here is the modified code in the component that handles the form submit:
async validateForm(e) {
    e.preventDefault();

    if (this.formValidators) {
        let errors = 0;

        for (let v of this.formValidators) {
            if (await v.validate()) {
                errors++;
            }
        }

        this.$data.isValid = !errors;

        if (!this.$data.isValid) {
            return;
        }
    }

    axios
        .post(window.location.href, this.$data)
        .then(result => {
            if (!this.formValidators) {
                return;
            }

            this.$data.isValid = result.data.success;

            if (!this.$data.isValid) {
                this.formValidators.forEach(v => v.setError(result.data.errors));
            }
        });
}
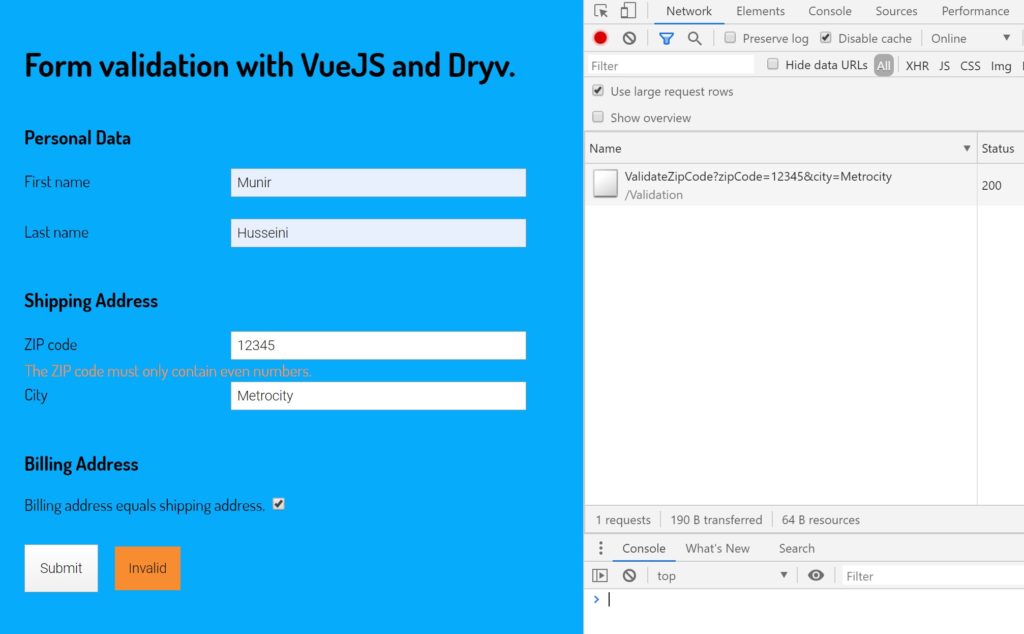
Great, so let’s build this and try it out. Let’s hit the page and validate the form once again.
Request failed with status code 404
Right. We need to expose the validation wrapper in a controller so that we can call it from outside.
Expose the asynchronous validation in a controller
Fo the code above to work correctly, we need an endpoint that can be called from the client. Let’s add a controller.
[Route("[controller]")]
public class ValidationController : Controller
{
    private readonly AsyncValidator asyncValidator;

    public ValidationController(AsyncValidator asyncValidator)
        => this.asyncValidator = asyncValidator;

    [HttpGet]
    [Route(nameof(AsyncValidator.ValidateZipCode))]
    public Task<DryvResultMessage> ValidateZipCode(string zipCode, string city)
        => this.asyncValidator.ValidateZipCode(zipCode, city);
}
This controller is pretty simple. It exposes actions that have the same names as the validation wrapper. When the client calls the controller action, the parameters are passed to the validation wrapper and the result is returned to the caller.
Remember: the validation wrappers (server and client) and the controller have no own functionality. Their sole purpose is to provide predictable naming and data structures for the code generation.
Now, we’ve got all our pieces together. When we run the code and trigger the form validation, the async form validation is correctly performed.
But that’s awfully lot of code
Really, how can the article say “made easy” and then suggest to write that much code?
The controller, the wrappers and the Vue components are only needed once. Once you have implemented those objects, adding new asynchronous validation methods is very easy. You put the validation code into the server-side wrapper, add one one-liner method to the controller and off you go.