

Advanced form validation can get tricky. Matching server and client validation with complex validation rules is also often very code-intensive. Complex validation for both server and client can be easily created and maintained by using the validation framework Dryv. This article shows how form validation with ASP.NET Core and VueJS can be made easy by using Dryv.
ASP.NET Core comes with built-in server-side validation and jQuery-based client-side validation. But what if you have a VueJS app and need to implement validation that takes place on the client as well as on the server? Currently, you would typically use a validation framework like VeeValidate or Vuelidate for the client-side and the ASP.NET Core model validation API for the server-side. Whenever the validation rules change, they have to be updated on both sides. Things get even nastier when runtime configuration needs to be taken into account: you will have to output the configuration to the client-side and write client-code to use the configuration. You must do a lot of work in order to get advanced validation scenarios working whilst keeping the server and the client in sync.
Dryv: Keeping client and server in sync
The validation framework Dryv allows you to write the validation rules with C# once, and then it automatically generates the client-side code. Both server-side and client-side code become extremely thinned out – no more need for much boilerplate code. Here’s how it works….
In this article, I’ll use the VueJS sample project from the Dryv repository on GitHub. As with all Dryv-based projects, you’ll start by writing your server-side view models and adding validation rules. In this example, there are two models, Person and Address, which are both wrapped in the HomeModel class. Here’s the code for those two models.
using System;
using Dryv.Rules;

namespace Dryv.SampleVue.Models
{
    public class Person
    {
        private static DryvRules<Person> ValidationRules = DryvRules.For<Person>()
            .Rule(m => m.FirstName, m => string.IsNullOrWhiteSpace(m.FirstName) ? "Please enter first name." : null)
            .Rule(m => m.LastName, m => string.IsNullOrWhiteSpace(m.LastName) ? "Please enter last name." : null)
            .Rule(
                m => m.FirstName,
                m => m.LastName,
                m => m.FirstName.Equals(m.LastName, StringComparison.OrdinalIgnoreCase) ? $"First and last name cannot both be '{m.FirstName}'." : null);

        [DryvRules]
        public string FirstName { get; set; }

        [DryvRules]
        public string LastName { get; set; }
    }
}
The rules for the Person class are pretty straight forward to read: Both first and last name are required and both fields cannot have the same value.
using System.Threading.Tasks;
using Dryv.Rules;

namespace Dryv.SampleVue.Models
{
    public class Address
    {
        private static DryvRules<Address> ValidationRules = DryvRules.For<Address>()
            .Rule(a => a.ZipCode, a => !a.Deactivated && string.IsNullOrWhiteSpace(a.ZipCode) ? "Please enter a ZIP code." : null)
            .Rule(a => a.ZipCode, a => !a.Deactivated && a.ZipCode.Trim().Length < 5 ? "ZIP code must have at least 5 characters." : null)
            .Rule(a => a.City, a => !a.Deactivated && string.IsNullOrWhiteSpace(a.City) ? "Please enter a city." : null)
            .ServerRule<ZipCodeValidator>(a => a.ZipCode, a => a.City, (a, validator) => a.Deactivated
                ? Task.FromResult(DryvResultMessage.Success)
                : validator.ValidateZipCode(a.ZipCode, a.City));

        [DryvRules]
        public string ZipCode { get; set; }

        [DryvRules]
        public string City { get; set; }

        public bool Deactivated { get; set; }
    }
}
The rules for the Address class contain a server-only validation rule: the rule uses an injectable object (ZipCodeValidator) to perform asynchronous validation. As it is server-only, this rule will not be translated into client-side code. Instead, you can implement this validation rule on the client-side manually. Alternatively, you can skip this rule on the client and only evaluate it on the server. Another alternative: Dryv can be extended to translate specific type and method calls to custom client code (recommended), or client-side code can be explicitly specified as a string (not that recommended). I’ll write dedicated blog posts on custom translation in the near future.
Server-side: The ‘normal’ rules
But for now, we want to validate the “normal” rules both on the server and on the client (i.e. rules we don’t need to extend Dryv for). Lets start with the server, since that’s easier. Dryv works with ASP.Net Core’s model validation API. So once you add a controller action that accepts HTTP POST or PUT verbs, the default model validation will kick in and validate the model. Here’s the code for that controller.
using System.Linq;
using Dryv.Extensions;
using Dryv.SampleVue.Models;
using Microsoft.AspNetCore.Mvc;

namespace Dryv.SampleVue.Controllers
{
    [Route("/")]
    public class HomeController : Controller
    {
        [HttpGet]
        public IActionResult Index()
        {
            return this.View();
        }

        [HttpPost]
        public IActionResult Post([FromBody]HomeModel _)
        {
            return this.ModelState.IsValid
                ? this.Json(new { success = true })
                : this.Json(new
                {
                    success = false,
                    errors = this.ModelState.ToDictionary(
                        s => string.Join('.', s.Key.Split('.').Select(v => v.ToCamelCase())),
                        s => s.Value.Errors.Select(e => e.ErrorMessage).First())
                });
        }
    }
}
In the POST controller action, the model state can be retrieved and the reported validation errors can be returned to the client. Both synchronous and asynchronous validation is performed. That’s it. Server-side validation is complete.
Client-side: The ‘normal’ rules
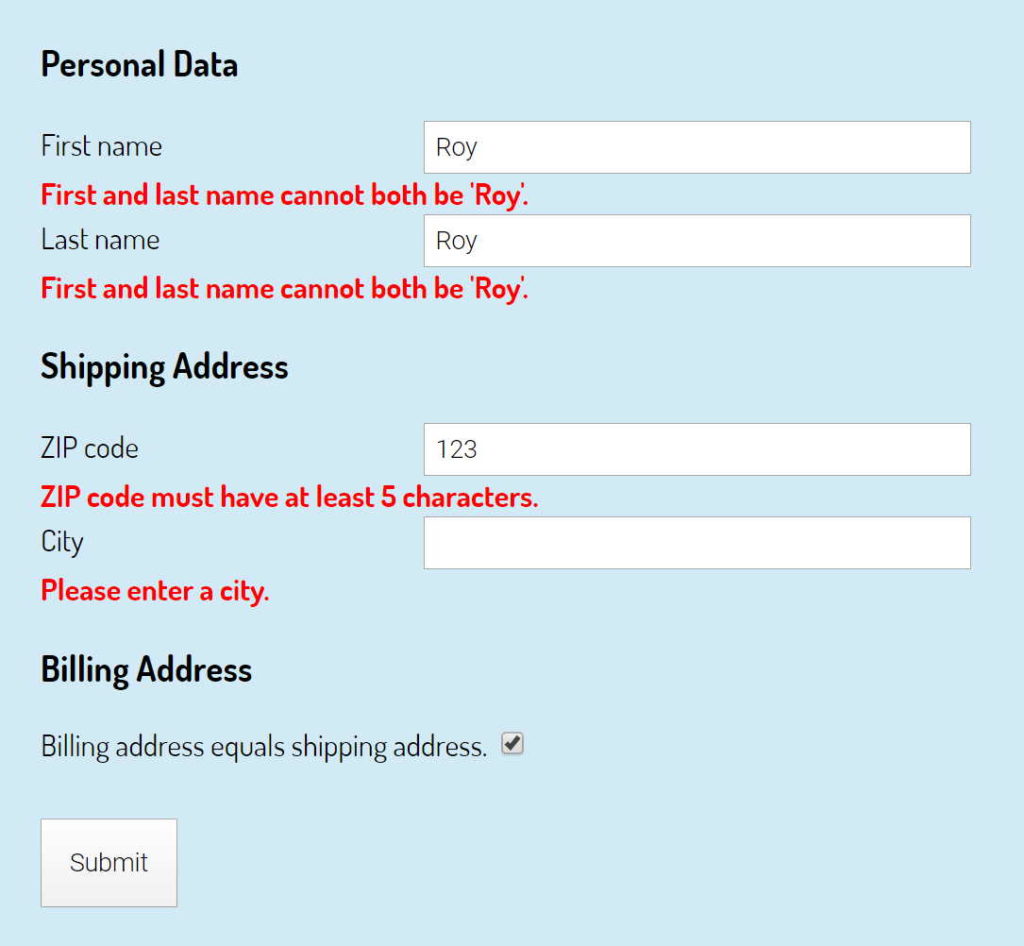
Now for the client-side. At first, we need a form for the user to enter data. Behold….
<div id="app">
    <h1>Form validation with VueJS and Dryv.</h1>
    <form v-on:submit="validateForm" method="post">
        <div class="form-content">
            <div class="form-block">
                <h3>Personal Data</h3>

                <form-input name="person.firstName" label="First name" v-model="person.firstName"></form-input>
                <form-input name="person.lastName" label="Last name" v-model="person.lastName"></form-input>
            </div>

            <div class="form-block">
                <h3>Shipping Address</h3>

                <form-input name="shippingAddress.zipCode" label="ZIP code" v-model="shippingAddress.zipCode"></form-input>
                <form-input name="shippingAddress.city" label="City" v-model="shippingAddress.city"></form-input>
            </div>

            <div class="form-block">
                <h3>Billing Address</h3>

                <div class="form-item">
                    <label for="billingAddress-deactivate">Billing address equals shipping address.</label>
                    <input id="billingAddress-deactivate" type="checkbox" v-model="billingAddress.deactivated">
                </div>

                <div v-show="!billingAddress.deactivated">
                    <form-input name="billingAddress.zipCode" label="ZIP code" v-model="billingAddress.zipCode"></form-input>
                    <form-input name="billingAddress.city" label="City" v-model="billingAddress.city"></form-input>
                </div>
            </div>
        </div>
        <div class="form-block">
            <input type="submit" value="Submit">
        </div>
    </form>
</div>

<script type="text/x-template" id="form-input">
    <div class="form-item">
        <div>
            <div class="form-input-label">
                <label :for="name">{{ label }}</label>
            </div>
            <div class="form-input-control">
                <input :id="name" v-bind:value="value" v-on:input="$emit('input', $event.target.value)">
            </div>
        </div>
        <div class="form-item-error" v-if="error">{{ error }}</div>
    </div>
</script>
Up until this point, everything is plain VueJS with no extras. The form consists of a couple of input fields which are wrapped in custom components. Now we need a mechanism that can find the validation rules for each form input and evaluate them whilst the form is being submitted. Here’s the script for the form input component.
Vue.component('form-input',
{
    props: ['value', 'type', 'name', 'label'],
    template: '#form-input',
    data() {
        return {
            error: null
        }
    },
    created() {
        const validator = window.dryv.validators[this.name];
        if (!validator) return;

        const formValidators = this.$parent.formValidators || (this.$parent.formValidators = []);
        formValidators.push({
            validate: () => (this.error = validator(this.$parent)),
            setError: errors => this.error = errors[this.name]
        });
    }
});
Upon creation, the component will try to find the validation rule based on the name of the component. I’ll show you where the validation rules come from later. If the component finds any rules, it registers itself with the parent component. Of course, this is over-simplified code, but it shows the main concepts of how this works. Real-world implementations will have to take any further sophistication into account.
We all need validation from our parents
Now that all form fields have found their validation rules and have registered with the parent component, the parent component can validate the form when it gets submitted. Here’s the code of the parent component.
const app = new Vue({
    el: '#app',
    data: {
        isValid: null,
        person: {
            firstName: null,
            lastName: null
        },
        shippingAddress: {
            zipCode: null,
            city: null
        },
        billingAddress: {
            zipCode: null,
            city: null,
            deactivated: true
        }
    },
    methods: {
        validateForm(e) {
            e.preventDefault();

            if (this.formValidators) {
                const errors = this.formValidators.map(v => v.validate());
                this.$data.isValid = errors.map(b => !b).reduce((a, b) => a && b);
                if (!this.$data.isValid) {
                    return;
                }
            }

            axios
                .post(window.location.href, this.$data)
                .then(result => {
                    if (!this.formValidators) {
                        return;
                    }

                    this.$data.isValid = result.data.success;

                    if (!this.$data.isValid) {
                        this.formValidators.forEach(v => v.setError(result.data.errors));
                    }
                });
        }
    }
});
Again, this code is pretty straight-forward: when the form is submitted, the parent component will iterate all field components and validate them. If any validation errors occur, their respective error messages will be shown right beneath the field. If no validation errors are found, the form is sent to the server. Since the server has additional validation that does not exist on the client, the server may find errors the client didn’t catch. In that case, an object is sent back to the client with the fields named like the form inputs and the values containing the error messages. The parent component passes the errors to the field input components and lets them pick out and display their respective error messages.
From the Razor view to the client
But there’s one more thing: how do the validation rules get to the client? This happens in the Razor view that contains the VueJS code. This example uses runtime VueJS compilation with all code directly on the HTML page. Of course, you can use Webpack and sorts instead. However, the Razor view that initially loads the VueJS app must contain code similar to the code below to output the translated validation rules to the client.
<script>
(function(dryv) {
    dryv.validators = {
        @Html.Raw(string.Join(",\n", from val in Html.GetDryvClientPropertyValidations()
                                     let field = val.Property.Name.ToCamelCase()
                                     let sep = string.IsNullOrWhiteSpace(val.ModelPath) ? string.Empty : "."
                                     select $@"""{val.ModelPath}{sep}{field}"": {val.ValidationFunction}"))
    };
})(window.dryv || (window.dryv = {}));
</script>
The extension method GetDryvClientPropertyValidations returns the translated rules for each field. The code above generates an object with fields named like the corresponding form inputs and which values contain JavaScript functions with the translated validation rules. The generated code below is prettified. The original generated code isn’t so nicely indented.
(function(dryv) {
    dryv.validators = {
        "billingAddress.zipCode": function(m) {
            return (function(a) {
                return ((!(a.billingAddress.deactivated) && !/\S/.test(a.billingAddress.zipCode || "")) ? "Please enter a ZIP code." : null);
            }).call(this, m) || (function(a) {
                return ((!(a.billingAddress.deactivated) && (a.billingAddress.zipCode.trim().length < 5)) ? "ZIP code must have at least 5 characters." : null);
            }).call(this, m);
        },
        "billingAddress.city": function(m) {
            return (function(a) {
                return ((!(a.billingAddress.deactivated) && !/\S/.test(a.billingAddress.city || "")) ? "Please enter a city." : null);
            }).call(this, m);
        },
        "person.firstName": function(m) {
            return (function(m) {
                return (!/\S/.test(m.person.firstName || "") ? "Please enter first name." : null);
            }).call(this, m) || (function(m) {
                return (m.person.firstName.toLowerCase() === m.person.lastName.toLowerCase() ? "First and last name cannot both be '" + m.person.firstName + "'." : null);
            }).call(this, m);
        },
        "person.lastName": function(m) {
            return (function(m) {
                return (!/\S/.test(m.person.lastName || "") ? "Please enter last name." : null);
            }).call(this, m) || (function(m) {
                return (m.person.firstName.toLowerCase() === m.person.lastName.toLowerCase() ? "First and last name cannot both be '" + m.person.firstName + "'." : null);
            }).call(this, m);
        },
        "shippingAddress.zipCode": function(m) {
            return (function(a) {
                return ((!(a.shippingAddress.deactivated) && !/\S/.test(a.shippingAddress.zipCode || "")) ? "Please enter a ZIP code." : null);
            }).call(this, m) || (function(a) {
                return ((!(a.shippingAddress.deactivated) && (a.shippingAddress.zipCode.trim().length < 5)) ? "ZIP code must have at least 5 characters." : null);
            }).call(this, m);
        },
        "shippingAddress.city": function(m) {
            return (function(a) {
                return ((!(a.shippingAddress.deactivated) && !/\S/.test(a.shippingAddress.city || "")) ? "Please enter a city." : null);
            }).call(this, m);
        }
    };
})(window.dryv || (window.dryv = {}));
The code in the Razor view above seems a little bit verbose. Why isn’t there an extension method that outputs the whole script tag? At the moment, there isn’t a one-size-fits-all solution available. Different projects differ a lot. For example, SPAs with many forms may need to load many validation rules up-front, which results in a very much different code organization than a single form on a page of a multi-page app. Other scenarios include group validation and warnings, which may need special handling (both topics that will be covered in later articles). The greatest reasonable common denominator are the translated validation rules per property (or group). If and when best practices eventually evolve, they could be incorporated into Dryv in the future. Suggestions and pull requests are always welcome.
Nevertheless, implementing form validation with ASP.NET Core and VueJS has already become significantly easier; thanks to Dryv.
Edited\Redacted by Amber Morgan.